さくらのVPS上のCentOS7にオンプレミスとしてJIRAをインストールした時の方法を共有します。
ちなみに、JIRA自体はクラウド版とオンプレミス版の2通りの購入方法があるのですが、オンプレミス版の方が断然お得です。
前提
前提となります。
-
rootユーザーの他に作業用ユーザーがいる。
-
CentOS7のセットアップには特に触れない。
-
インストールするJIRAは2018/04/02での最新バージョン7.8.1。
-
OSは64bitを想定。
以降、作業となります。
作業内容
以降はCentOS7のサーバーにログインした状態から実施する想定で記載しています。
インストーラーDL
1
2
|
$ wget https://www.atlassian.com/software/jira/downloads/binary/atlassian-jira-software-7.8.1-x64.bin
$ chmod a+x atlassian-jira-software-7.8.1-x64.bin
|
インストーラー実施
Noteで囲っている部分はメモとなります。Note部分を参考に進めてください。
 1
 2
 3
 4
 5
 6
 7
 8
 9
10
11
12
13
14
15
16
17
18
19
20
21
22
23
24
25
26
27
28
29
30
31
32
33
34
35
36
37
38
39
40
41
42
43
44
45
46
47
48
49
50
51
52
53
54
55
56
57
58
59
60
61
62
63
64
65
66
67
68
69
70
71
72
73
74
75
76
77
78
79
80
81
82
83
84
85
86
|
$ sudo ./atlassian-jira-software-7.8.1-x64.bin

Starting Installer ...
3 29, 2018 10:57:56 午後 java.util.prefs.FileSystemPreferences$1 run
情報: Created user preferences directory.
3 29, 2018 10:57:56 午後 java.util.prefs.FileSystemPreferences$2 run
情報: Created system preferences directory in java.home.

This will install JIRA Software 7.8.1 on your computer.
OK [o, Enter], Cancel [c]

Note------------
JIRAインストールして良いか聞いている。エンターで次へ。
-------------------

Choose the appropriate installation or upgrade option.
Please choose one of the following:
Express Install (use default settings) [1], Custom Install (recommended for advanced users) [2, Enter], Upgrade an existing JIRA installation [3]

Note------------
インストール方法を聞いている。3はアップグレードなので論外として1か2を選択する必要がある。
推奨されている2を入力しエンター。
-------------------

Where should JIRA Software be installed?
[/opt/atlassian/jira]

Note------------
インストール場所を決定。今回はこのパスで良いのでそのままエンター。
変更する場合はパスを入力しエンター。
-------------------

Default location for JIRA Software data
[/var/atlassian/application-data/jira]

Note------------
JIRAのデータの保存場所を決定。今回はこのパスで良いのでそのままエンター。
変更する場合はパスを入力しエンター。
-------------------

Configure which ports JIRA Software will use.
JIRA requires two TCP ports that are not being used by any other
applications on this machine. The HTTP port is where you will access JIRA
through your browser. The Control port is used to startup and shutdown JIRA.
Use default ports (HTTP: 8080, Control: 8005) - Recommended [1, Enter], Set custom value for HTTP and Control ports [2]

Note------------
JIRAのポート設定。8080で問題ないのでエンター。
変更する場合はポートを入力しエンター。ここは試してないのでどういったフォーマットで記入すべきか不明。
-------------------

JIRA can be run in the background.
You may choose to run JIRA as a service, which means it will start
automatically whenever the computer restarts.
Install JIRA as Service?
Yes [y, Enter], No [n]

Note------------
サーバー再起動時、自動でJIRAを立ち上げるかの設定。
yを入力しエンター。
-------------------

Details on where JIRA Software will be installed and the settings that will be used.
Installation Directory: /opt/atlassian/jira
Home Directory: /var/atlassian/application-data/jira
HTTP Port: 8080
RMI Port: 8005
Install as service: Yes
Install [i, Enter], Exit [e]

Note------------
今までの設定内容で問題ないかの確認。問題なければiを入力しエンター。
これにてインストールされる。
-------------------

Extracting files ...

Please wait a few moments while JIRA Software is configured.
Installation of JIRA Software 7.8.1 is complete
Start JIRA Software 7.8.1 now?
Yes [y, Enter], No [n]

Note------------
インストールが完了。
JIRAを起動するかの確認なのでyを入力しエンター。
-------------------
|
ここで注意点ですが、firewallの設定で8080のポートが空いていない場合解放しないと使用出来ないので、以下のコマンドにて解放します。空いている場合はもちろん不要です。
1
2
3
|
$ sudo su -
# iptables -A INPUT -p tcp -m tcp --dport 8080 -j ACCEPT
# service iptables save
|
DBのセットアップ
JIRAのインストールが完了したらDBを用意します。今回使用するのはPostgreSQLです。
CentOS7に元から入っているMySQLを使用したかったのですが、別途ドライバーをインストールする必要があるらしく、面倒臭かったのでPostgreSQLにしました。
以下のNoteで囲っている部分を参考に進めてください。
 1
 2
 3
 4
 5
 6
 7
 8
 9
10
11
12
13
14
15
16
17
18
19
20
21
22
23
24
25
26
27
28
29
30
31
32
33
34
35
36
37
38
39
40
41
|
# yum -y install postgresql-server
# postgresql-setup initdb
# cd /var/lib/pgsql/data

# cp postgresql.conf postgresql.conf.org
# echo "listen_addresses = '*'" >> /var/lib/pgsql/data/postgresql.conf
# diff -u postgresql.conf.org postgresql.conf

Note------------
以下となっていることを確認。PostgreSQLでどのIPアドレスをリッスンするか設定。今回は限定しません。
 # Add settings for extensions here
+listen_addresses = '*'
-------------------

# cd /var/lib/pgsql/data
# cp pg_hba.conf pg_hba.conf.org
# echo "# PostgreSQL Client Authentication Configuration File" >  ./pg_hba.conf
# echo "# ===================================================" >> ./pg_hba.conf
# echo "local all all              trust"                      >> ./pg_hba.conf
# echo "host  all all 127.0.0.1/32 trust"                      >> ./pg_hba.conf
# echo "host  all all ::1/128      trust"                      >> ./pg_hba.conf
# cat pg_hba.conf

Note------------
以下となっていることを確認。PostgreSQLでどのIPアドレスからのアクセスを許可するかの設定。ローカルIPからのみアクセスを許可します。
# PostgreSQL Client Authentication Configuration File
# ===================================================
local all all              trust
host  all all 127.0.0.1/32 trust
host  all all ::1/128      trust
-------------------

# service postgresql restart
# psql -U postgres -c "ALTER ROLE postgres WITH PASSWORD 'YOUR_PASSWORD'"
Note------------
YOUR_PASSWORDは任意の内容に置き換えてください。
-------------------
# psql -U postgres -W -c "CREATE DATABASE YOUR_DATABASE";
Note------------
YOUR_DATABASEは任意の内容に置き換えてください。
-------------------
|
JIRAのセットアップ
最後の手順のJIRAのセットアップです。
http://”ドメイン or IPアドレス”:8080 にアクセスしセットアップ画面を表示します。
“ドメイン or IPアドレス” はVPSに割り当てられているIPアドレスかホスト名を入力してください。
さくらのVPSは標準でどちらも割り当てられているはずなのでお好きな方で構わないと思います。
セットアップは以下の通りに進めていってください。

「自分でセットアップする」を選択し「次へ」をクリック。
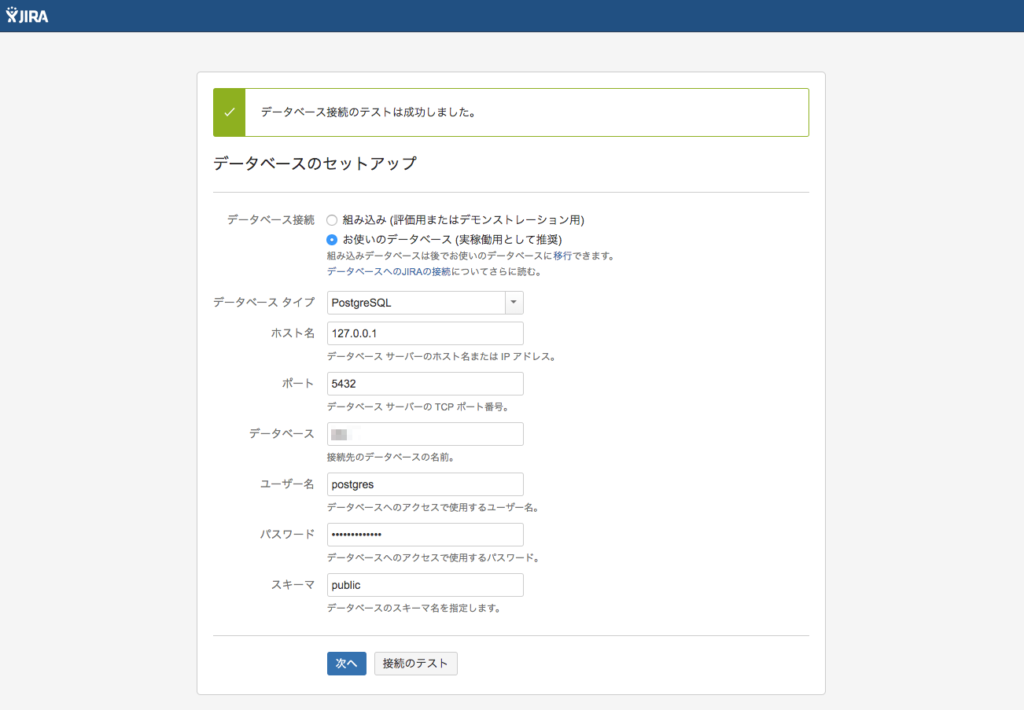
「データベース」と「パスワード」を「DBのセットアップ」で作成した内容にて入力。
「接続のテスト」をし、問題なければ「次へ」をクリック。

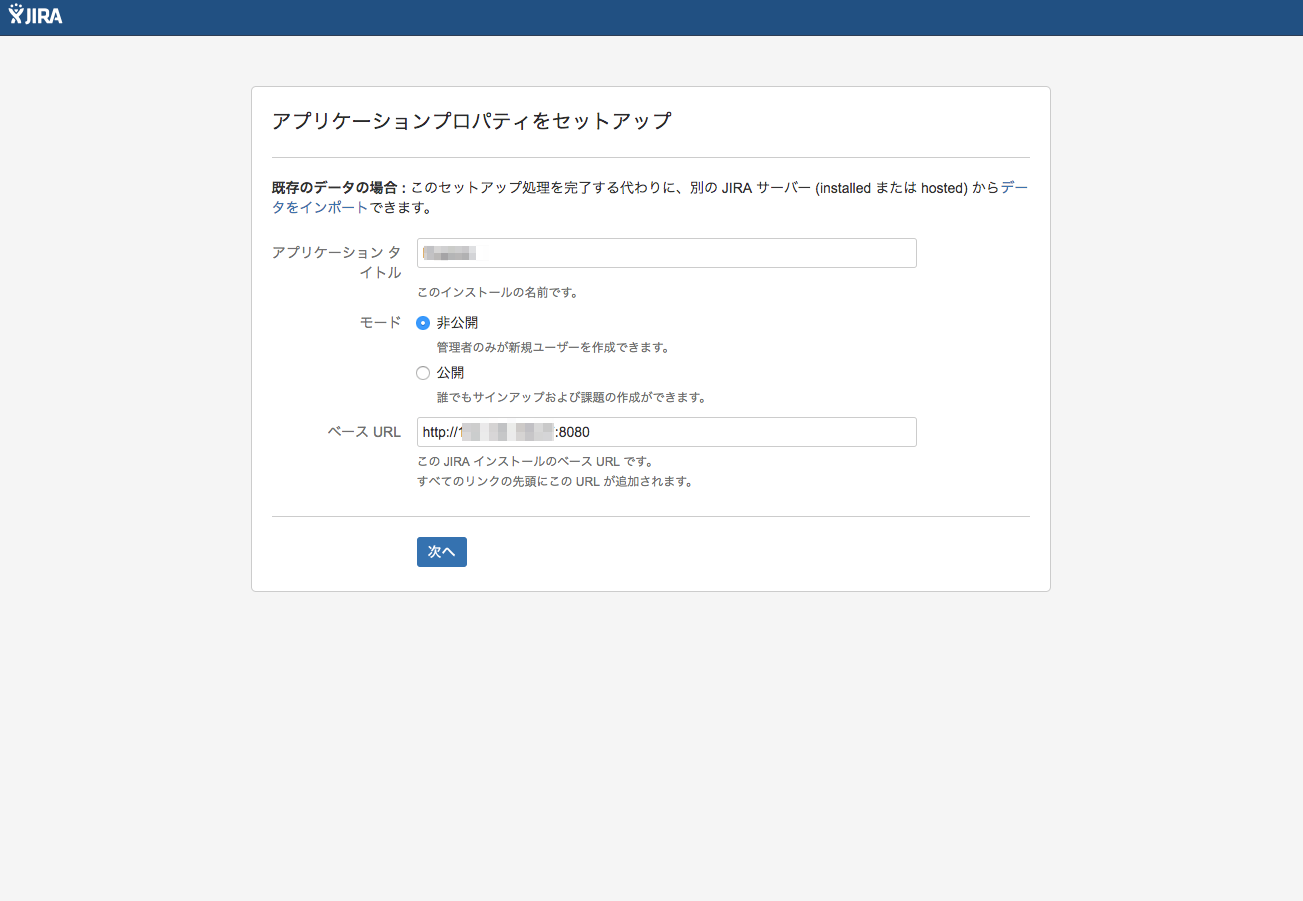
「アプリケーションタイトル」を任意の内容で入力し、「モード」を「非公開」に選択(個人利用であれば非公開で問題ないと思います)。「ベースURL」はIPアドレス(orホスト名)を入力。(http://IPアドレス:8080)
全て入力したら「次へ」をクリック。
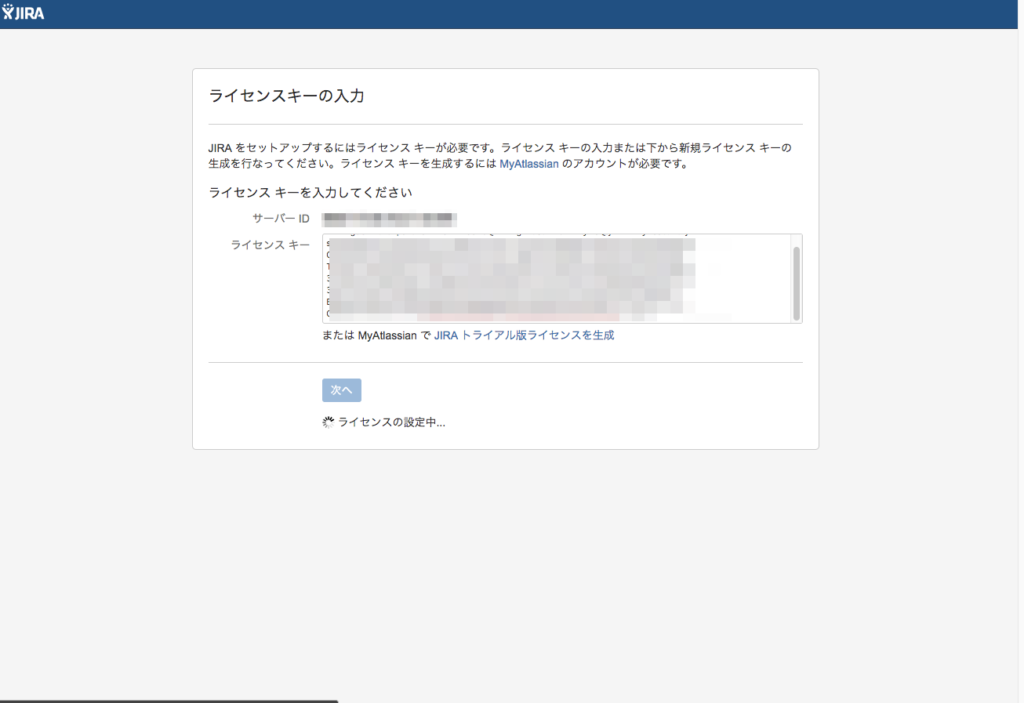
サーバーIDが自動で割り振られているかと思います。こちらはライセンスキー発行時に使用します。ライセンスキー発行時、サーバーIDを入力しないと取得出来ないようになっています。
ライセンスキーを取得したら「ライセンスキー」部分に入力し「次へ」をクリックでJIRAのセットアップが完了です。
最後に
以上、CentOS7にJIRAをインストールする方法の共有でした。
タスク管理ツールなどのビジネスで使うツールは私生活でも有用なのでどんどん活用していきたいですね。
ツールを使い生産的な生活を送っていきましょう。